Submitted by Ryan Minard

It all starts with the toy of your choosing, for this I will focus on Dunnys. I find it easier to do everything you need once they are disassembled. There are a few ways to do this, I personally like using a small hair dryer to warm them up and they (head and arms) pop apart. Another easy method is letting them soak for a little bit in warm/hot water. Be mindful of how long you heat/soak, the vinyl will get soft and you could warp it.
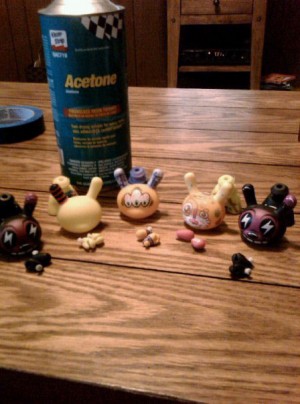
Once they are in pieces, it is time to strip the original design. I find this easiest with a simple wash cloth and some acetone, don’t need anything fancy. Remember a little goes a long way too. I say this because the vapor/odor from the acetone can be very strong. Highly recommend doing this is a well ventilated area or use a mask or respirator for safety. Use a new section of cloth every few applications, otherwise you will just be smearing old paint around. After you have removed all of the paint from the figure, I find it best to give them a little scrub. Some warm water and soap does the trick. This will clean any excess residue off the figure and get them not smelling so bad – pic ( https://i41.tinypic.com/2nve69s.jpg ).
My next step is to prep the Dunny to be reassembled. To do this I like to trim off the “nubs” or “mushrooms” off the head and arms – pic ( https://i40.tinypic.com/1ibs6a.jpg ). Having a straight post is much easier to put back together once you are finished in my opinion. For this I go back to my hair dryer to warm the Dunny up to soften the vinyl and then use a nice sharp #11 x-acto blade. For safety purposes always cut away from yourself – these blades are super sharp and it is doesn’t take much to lose part of a finger, just ask Huck – pic ( http://tinyurl.com/hucksfinger ) yeah that is some finger tip on the mat.
Once I have these trimmed up, I always do a test fit just to see if I need to trim back any more. After I think the trimming is done, I like to tape off my neck stumps and arms. I leave a “tail” of tape too, this makes it easier for me to paint them because I have something to hold onto and somewhere to put them (more on this in a sec) in between coats. For the heads, I don’t bother using tape, I personally use a rod of some sort to balance the head on for painting. Here is a shot of some tape examples – (https://i44.tinypic.com/1z3xde9.jpg ).
Now after all of that is done, I really recommend priming. Primer is going to get you a nice surface on the Dunny and give the paint something to stick to. I use a simple Krylon white spray acrylic primer. Some people will say priming is a must others will say don’t bother. For me, I like to prime. I like to get 1 solid coat down and then come back for a light second. Once my primer is dry, I will inspect the primer and hit any rough spots with a 400 grit wet sand.
After all of that, you are ready to paint. I personally use acrylics and paint completely by hand with a brush. I have been experimenting lately with some paint markers as well. When I paint, I put together these little booths – pic (https://i31.tinypic.com/2lduds8.jpg ). This is just a simple box taped up and has some T pins stuck through it with a little bend on the end. This allows me to hang the pieces by the “tail” of tape I leave on them in between coats of paint.
After you are done painting, it is highly recommended to seal your design. I personally like flat clear coats. Some people like semi gloss to high gloss, it is all up to you.
To finish up my customs I like to make packages. This way, if I ever intend on selling them I have a way to transport it and a way for the owner to store it if they wish. For this I found a nice template posted by a fellow KR board member. He was kind enough to put up a download link to the template that you can get here –http://tinyurl.com/dunnybox . This is the smaller box. What I like to do is open this in Illustrator and re-size it by 105-110%. That gives me a little more room to work with when putting it together. I use the template and create graphics for the box. Once my graphics are done, I just do a simple print out on a color printer and spray mount this to a nice chip-board or heavy stock. I recommend 3M spray adhesive – it is super nice.
Once I have the design mounted, I like to score my folds, makes it easier to fold and they look cleaner. Then I cut it out with scissors or another #11 x-acto blade. Once cut out, I make my folds and glue along the seems – pic ( https://i31.tinypic.com/2wcdu05.jpg ).
That about wraps it up. Like I said, I am no expert and my way might not be everyone’s way of doing it. Hopefully you can take some things from this write-up and go out there and create! Feel free to hit me up with any questions, you can find me on twitter at twitter.com/droppixel or stop by my website (www.droppixel.com) and shoot me a message that way! droppixel