Did you see the preorder for Amanda Visell’s Pandalope Labbit?
Amanda has amazing skills when it comes to her art, but most of the time we only see the finished product. We never get to see all the painstaking steps that goes into creating the art and toys we love. Amanda was gracious enough to help us out with this. She documented the entire process from sketch to finished Pandalope for us all to see.
Now in her own words, here is the creation of the amazing wood Pandalope Labbit.

Hi world. So this is a little breakdown of my process for customizing KR x Frank Kozik’s 10 inch Labbit. I have customized my own Wood Labbit 6 or 5 inch or whatever figure, and I have messed with the 10 inch before, that’s how I designed the production Wood Labbit that KR made. Doing a run of these monsters was a little ambitious, especially since a major part of the design involves real bamboo that required a lot of different shapes and sizes.
Lets begin!
Ok, so I start with a concept. So… a doodle. I don’t need to get fancy with it because I’m the one making it, and I know what’s in my own brain. Different than designing a figure that goes into production with a factory, in that case everything has to be very clear and specific.

Unpacking all of these was pretty exhausting. George likes boxes

Goodbye entire house, these things took over. I had to create stations for each task. Like a sawing area, a bamboo zone, a paintin’ station.

I should mention I make 1 first, completely finished. I use it as a guide to refer back to but also it tells me what supplies I need and in what quantity. So for example I mix the paint I use for the first one, to be consistent I then order custom mixed paint in the needed quantities (if I don’t screw up).

These involved so much physical labor we had a special intern day to help with some repetitive tasks. Everything had to be hand done. Hand cut, hand sawed. All with great attention to detail. The way it’s designed, if we cut one incorrectly, it’s ruined. Manly decided to make a cameo. Mostly he’s not very helpful.

So the bamboo, I harvested myself from our property. Dried it, cut it up. It’s hard to explain what a pain this is. Making the first sculpture gave me a template of how many pieces I needed, what size, what angle to cut, where the knots should be. Then building the shapes… Drilling at specific angles, each joint has an internal dowel to hold it together, blah blah blah.

I use styrene, just thin sheets of plastic to help me build the shapes, also to form the bamboo leaves. You can see here that the tail stump is actually a sawed off Labbit ear plugged into the butt backwards.

More styrene on the tail and a wood half ball to help build up the new shorter, rounder ear. Apparently I selected a not so common size ball and had to track em down.

And now the magic of magic sculpt. (Google it.) Epoxy putty that sets hard as a rock. If this post happens to interest you and you make anything with Sculpey that is final art (not just something you’re making a mold of), you’re doing it wrong. That stuff rots. If you’re selling art that has sculpey parts, that’s lame for the buyer. Below is Michelle’s muddy hand smoothing out the magic sculpt with some water.

These guys are getting sanded and the first bits of bamboo attached.

Here, see? Bamboo. Just look at all those angles. And matching the perfect angle at the base to live on the weird angle of the labbit face was tricky!

Paintin’ time!

I actually don’t prime them to a perfect white. I find spray paint iffy. Mostly I’m giving my paint something to stick to. Also the key is SANDABLE primer. In all things.

This is the halfway point. Like oh I’m done, oh I haven’t started. Knuckle cracking time.

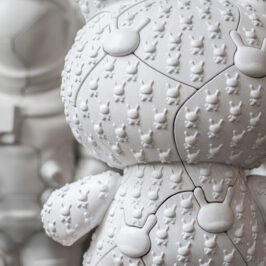
Let’s paint! The colors appear simple on this one but I have 5 or 6 different grays being used.

Gray on gray on gray on gray. The wood grain on the dark gray and the wood grain on the white are actually 2 different shades.

And speaking of wood grain… I find the Labbit super tricky to paint on, it’s like painting a ball, you have to do it in sections and get creative how you prop them up.

Lots of painting and painting painting. Leaves are the final touch then…
They’re alive!
Thank you Amanda for the glimpse into your creation process. If you would like to preorder one of the limited 25 wood Pandalope Labbit, simply go here.